Maintaining the pristine condition of electronic devices is paramount, especially when it comes to their primary interface: the display. A damaged screen can significantly impair a device’s functionality and diminish the user experience. Whether through accidental drops or unforeseen mishaps, screen damage can occur to even the most meticulously cared-for gadgets. Fortunately, with the appropriate knowledge and guidance, replacing a damaged display can be an accessible and rewarding endeavor.
This comprehensive guide will meticulously lead you through the intricate process of replacing a damaged display, empowering you to restore your device to its former glory. We will delve into the essential tools and materials required, provide step-by-step instructions, and offer helpful tips to ensure a seamless and successful repair.
Samsung S21 Ultra Screen Replacement Guide
Table of Contents
The purpose of this guide is to provide step-by-step guidance on how to replace the display panel on a Samsung S21 Ultra device. The guide is aimed at experienced technicians and individuals with a deep understanding of electronic repair techniques. It is assumed that the reader has a comprehensive knowledge of the internal components of the device and the necessary tools for carrying out the repair.
Prior to initiating the repair, it is imperative to discharge the device’s battery and ensure that all power is disconnected. The subsequent sections of this guide will lead you through the disassembly procedure, the removal of the damaged display panel, and the installation of the new display panel. Throughout the process, it is paramount to exercise meticulous care and precision to prevent further damage to the device.
Note: This guide is intended for educational purposes only. The author assumes no responsibility for any damage or injury incurred while following these instructions.
Tools and Materials Required
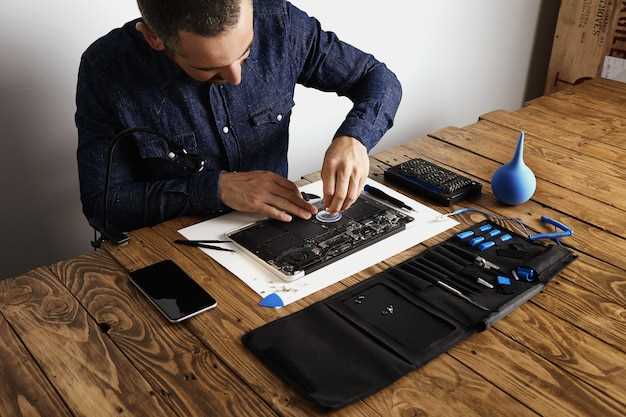
Before embarking on your screen replacement journey, it is essential to gather the necessary tools and materials to ensure a smooth and successful repair process. This section will provide a comprehensive list of essential items you will need.
Step-by-Step Disassembly Instructions
This section outlines a systematic procedure for carefully dismantling the device, ensuring component safety and a smooth reassembly process.
Materials Required:
- Precision screwdriver set
- Plastic pry tool
- Tweezers
Removing and Replacing the Screen
This section of the guide will provide detailed instructions on how to remove and replace the display assembly of your device. It is important to note that this procedure requires specialized tools and knowledge, and should only be attempted by qualified individuals.
Tools Required:
- Phillips #00 screwdriver
- Tri-point Y000 screwdriver
- Spudger or opening tool
- Suction cup
- Isopropyl alcohol (91% or higher)
Step 1: Safety Precautions
Before beginning, ensure that your device is powered off and disconnected from any power sources. Wear appropriate safety gear to protect yourself from any potential hazards.
Step 2: Removing the Back Cover
Locate the SIM tray and insert the SIM tray ejector tool or a small pin into the hole next to it. Gently push on the ejector to remove the SIM tray. Use the Phillips #00 screwdriver to remove the screws securing the back cover. Carefully separate the back cover from the device by using a spudger or opening tool to pry it loose.
Step 3: Disconnecting the Battery
Locate the battery connector and gently lift it up using the spudger or opening tool. This will disconnect the battery from the motherboard.
Step 4: Removing the Motherboard
Use the Phillips #00 screwdriver to remove the screws securing the motherboard to the frame. Gently lift the motherboard out of the frame and place it aside.
Step 5: Removing the Display Assembly
Use the spudger or opening tool to carefully pry up the edges of the display assembly. Be cautious not to damage the flex cables connecting the display to the motherboard. Gently lift the display assembly out of the frame and place it aside.
Step 6: Replacing the Display Assembly
Take the new display assembly and carefully align it with the frame. Gently press on the edges to secure it in place. Connect the flex cables to the motherboard. Ensure that they are firmly seated.
Step 7: Reassembling the Device
Carefully place the motherboard back into the frame and secure it using the Phillips #00 screws. Connect the battery connector and secure the back cover using the screws. Insert the SIM tray back into its slot.
Step 8: Testing the Device
Power on the device and check if the display is working properly. If any issues occur, recheck the connections and ensure that all components are securely seated.
Reassembly and Function Testing
Once the new screen is installed, it’s time to reassemble the device and test its functionality. Follow these steps carefully to ensure a proper reassembly:
1. Reattach the back panel by aligning it with the device’s edges and pressing it firmly into place. Ensure all clips and screws are engaged.
2. Connect the battery connector to the motherboard.
3. Insert the SIM card and turn on the device.
4. Test the new screen by performing various functions, such as scrolling, tapping, and using the camera.
5. If everything is functioning correctly, congratulations! You have successfully replaced the device’s screen.
Troubleshooting Tips
If you encounter any difficulties during the screen replacement process, refer to these troubleshooting tips to diagnose and resolve the issue:
Power Issues
If the device does not power on after the screen replacement:
- Check that the battery is properly connected to the motherboard.
- Examine the power button for any damage or debris.
- Ensure the charging port is free of any obstructions.
Display Issues
If the screen is unresponsive or displays abnormalities:
- Check the screen cable connections to the motherboard.
- Inspect the LCD display for any damage or cracks.
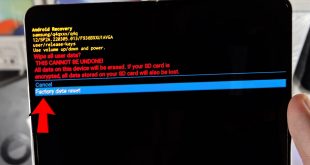
- Restart the device or perform a factory reset.
Common Errors
If you encounter specific error messages or notifications:
- Refer to the device’s support documentation or online forums for assistance.
- Contact the manufacturer’s customer service for further guidance.
Additional Tips
- Use high-quality replacement parts.
- Work in a well-lit and clean area.
- Follow the replacement guide carefully and take your time.
Safety Precautions
Before embarking on the delicate task of replacing your smartphone’s display, it is imperative to prioritize safety. Neglecting these precautions could exacerbate existing damage or create new hazards.
1. Disconnect the Battery: Power down the device and disconnect the battery to prevent electrical shock.
2. Electrostatic Discharge (ESD) Protection: Wear an anti-static wrist strap or work on a grounded surface to avoid damaging sensitive components.
3. Sharp Edges and Glass: Handle the broken display with care, using gloves or protective tools, to avoid cuts or lacerations.
4. Choose the Right Tools: Use precision screwdrivers and tools specifically designed for smartphone repair to avoid damaging delicate parts.
5. Clean Workspace: Work in a clean and well-lit area to avoid introducing dust or debris into the device during assembly.
Q&A
How long does the Samsung S21 Ultra screen replacement process take?
The Samsung S21 Ultra screen replacement process typically takes around 1-2 hours to complete. However, the exact time will vary depending on the experience of the repair technician and the availability of parts.
What is the cost of replacing the Samsung S21 Ultra screen?
The cost of replacing the Samsung S21 Ultra screen varies depending on the repair provider and location. However, it generally ranges from $150-$300. Authorized Samsung repair centers usually charge more than third-party repair shops.
Can I replace the Samsung S21 Ultra screen myself?
While it is possible to replace the Samsung S21 Ultra screen yourself, it is not recommended unless you have experience with smartphone repair. The process is complex and requires specialized tools. If you attempt to replace the screen yourself and damage your phone, you may void the warranty.