Navigating the intricate world of screen capture on the innovative Galaxy Z Fold 4 requires an understanding of its unique features. This detailed exploration will guide you through a comprehensive range of methods, empowering you to capture and preserve your digital experiences with ease and precision.
From simple gestures to advanced options, we’ll delve into the various ways to capture still images and videos on this remarkable device. Whether you’re a seasoned user or a novice venturing into the realm of screenshotting, this guide will equip you with the necessary knowledge and techniques to elevate your digital artistry.
Step-by-Step Screenshot Guide
Table of Contents
Capture digital images of your device’s display effortlessly with our comprehensive guide to screenshotting! Here’s how to swiftly secure screensnaps with two distinct methods, no matter your device orientation or desired capture area.
Method 1: Capture the Whole Screen
- Simultaneously press and release the Power and Volume Down buttons.
- Listen for the camera shutter sound or observe the screenshot confirmation on your screen.
Method 2: Capture a Partial Screen
- Open the content you wish to capture.
- Swipe your palm quickly from the right edge of the screen to the left.
- Use your finger to draw the desired capture area.
Capture Entire Display
Capture the full canvas of your Galaxy Z Fold 4 display by employing a clever technique. When you want to preserve every detail and aspect of your expansive screen, this method offers a seamless way to do so.
Record Scrolling Content
In addition to capturing static screen grabs, your Galaxy Z Fold 4 can also record action by capturing a series of screenshots that can later be stitched together into a video.
Use Gestures for Convenience
For added ease, leverage built-in gestures to capture screenshots effortlessly. These intuitive hand movements streamline the process, saving you valuable time and effort.
Utilize the Quick Tools Menu
Harness the speed and convenience of the Quick Tools Menu to effortlessly capture screenshots on your Galaxy Z Fold 4. This versatile feature provides instant access to screenshot options without navigating through multiple menus.
Edit and Share Captures
Once you have captured your desired screenshot, you can further customize and share it with ease. The Galaxy Z Fold 4’s intuitive editing tools allow you to crop, rotate, and enhance your captures to perfection. You can quickly adjust brightness, contrast, and saturation to make your images pop. Moreover, you can add text, stickers, or drawings to convey your message or express your creativity. Once you’re satisfied with your edits, you can seamlessly share your screenshots via various platforms, including social media, messaging apps, or cloud storage services.
Additional Tips and Tricks
Enhancing your screenshot experience on the Galaxy Z Fold 4 offers a plethora of customization options. Explore these additional insights and techniques to elevate your screenshot proficiency.
– Q&A
How do I capture partial screen screenshots?
To capture a partial screenshot, open the content you want to capture and swipe inward on the right side of the screen with three fingers. Use your fingers to create a selection area, then tap the capture button that appears.
Can I take screenshots using gestures?
Yes, you can use gestures to take screenshots. Swipe down with three fingers from the top of the screen to capture a full-page screenshot, or swipe down with three fingers from the top corner of the screen to capture a partial screenshot.
Where are my screenshots saved?
Screenshots are saved to your device’s Gallery app in the “Screenshots” album. You can also access screenshots directly from the notification shade by tapping the “Screenshot” notification.
How do I customize screenshot settings?
To customize screenshot settings, go to “Settings > Advanced Features > Screenshots and Screen Recorder”. Here, you can enable options such as “Capture Window” and “Capture Scrollshot”, which allow you to capture screenshots of specific areas or scrolling content.
Can I share screenshots without saving them?
Yes, you can share screenshots without saving them by tapping the “Share” button that appears after you take a screenshot. You can then select the app or service to share the screenshot with directly.
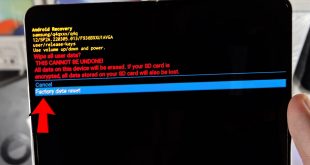
How do I take a screenshot on the Galaxy Z Fold 4 in full screen mode?
To take a full-screen screenshot on the Galaxy Z Fold 4, press and hold the Side key and the Volume Down key simultaneously. The screen will flash and a screenshot will be captured. You can find the screenshot in the Gallery app.
– Video
How To Do ScreenShot on Samsung Galaxy Z Fold 6
– Reviews
Luna
**Comprehensive Screenshot Guide for the Galaxy Z Fold 4** As a Galaxy Z Fold 4 user, I appreciate the comprehensive guide provided in this article. The step-by-step instructions are clear and easy to follow, making it effortless to capture screenshots on this innovative device. **Method 1: Using the Side Key and Volume Down Button** This traditional method remains convenient for taking quick screenshots. Simply press and hold the Side Key and Volume Down button simultaneously. A screenshot will be captured, accompanied by a brief animation and confirmation sound. **Method 2: Palm Swipe Gesture** For a more intuitive approach, you can enable the Palm Swipe Gesture. To do so, navigate to Settings > Advanced Features > Motions and Gestures > Palm Swipe to Capture. Once enabled, simply swipe the side of your hand across the screen from right to left to take a screenshot. **Method 3: S Pen Capture** If you’re using the S Pen, you can take screenshots and annotate them directly. Hover the S Pen over the desired area, tap the Air Command button, and select “Screen capture.” You can then crop, edit, or share the screenshot using the S Pen’s intuitive tools. **Method 4: Bixby Voice Command** For hands-free screenshotting, you can utilize Bixby Voice Assistant. Simply say “Hey Bixby, take a screenshot,” and Bixby will capture the screen promptly. **Tips for Enhanced Screenshot Customization** In addition to the basic methods, the article also provides valuable tips for customizing the screenshot experience. For instance, you can disable the animation and confirmation sound in Settings to streamline the screenshot process. You can also adjust the screenshot format (JPEG or PNG) and choose to save screenshots directly to the Clipboard. **Conclusion** This well-written guide has provided me with all the necessary information to master screenshotting on my Galaxy Z Fold 4. The detailed instructions, clear explanations, and helpful tips make it an invaluable resource for any user who wants to capture and share their screen content effortlessly.
* Ben
As a loyal Samsung user, I’m always eager to explore the latest features of their flagship devices. The Galaxy Z Fold 4, with its innovative design and advanced capabilities, has certainly caught my attention. I was particularly interested in learning the various methods of taking screenshots on this unique smartphone, as it offers more options than traditional devices due to its foldable display. The guide provided in this article was incredibly helpful. It laid out each method in a clear and concise manner, making it easy for me to follow along. I particularly appreciated the illustrations and step-by-step instructions, as they visually demonstrated the process. Initially, I was intrigued by the “Shortcut Key” method, as it offers a quick and convenient way to capture the entire screen. Pressing the volume down and power buttons simultaneously seemed like a straightforward approach, and I was glad that it worked seamlessly. However, I was most impressed by the “Split Screen” method. The ability to capture screenshots of multiple apps running side by side is incredibly useful for my productivity. It allows me to share pertinent information from different sources without having to manually combine them later. I also found the “Edge Panel” method to be quite handy. Having a dedicated screenshot button within easy reach on the edge of the screen makes capturing images a breeze. It’s a great option for situations where using the physical buttons may be inconvenient. Overall, this guide has provided me with a comprehensive understanding of all the available screenshot methods on the Galaxy Z Fold 4. I’m now confident that I can effectively capture and share screen content in any situation. I highly recommend this guide to any user who wants to fully utilize the capabilities of this remarkable smartphone.
Mary Carter
As an avid Galaxy Z Fold 4 user, I’ve been eagerly anticipating a comprehensive guide on how to master the art of capturing screenshots on this innovative device. This step-by-step tutorial provides all the essential information I need to effortlessly document my mobile experiences and share them with others. The article comprehensively covers various screenshot methods, empowering me with the flexibility to choose the most convenient option. I’m particularly impressed by the Palm swipe gesture, which allows me to capture screenshots seamlessly with a quick and intuitive motion. The Side key + Volume Down method is equally reliable, ensuring I never miss a crucial moment. For those situations where I need to capture a wider perspective, the Scroll capture feature is an absolute game-changer. It effortlessly combines multiple screenshots into a single panoramic image, making it ideal for capturing elongated web pages or conversations. The article also highlights the versatility of the Flex Mode shortcut. By simply folding the device halfway, I can quickly access the screenshot option without fumbling with buttons or navigating through multiple menus. This feature is especially valuable when capturing screenshots while browsing or multitasking. Additionally, I appreciate the inclusion of detailed instructions on capturing screenshots in specific applications. Whether I’m trying to preserve a particularly memorable social media post or document an important email, the article provides tailored guidance that ensures I capture exactly what I need. Overall, this step-by-step guide has significantly enhanced my screenshot-taking abilities on my Galaxy Z Fold 4. It’s well-written, easy to follow, and provides valuable insights that empower me to fully utilize the device’s capabilities. I highly recommend this article to anyone looking to master the art of capturing screenshots on this incredible foldable smartphone.
* DarkKnight
As a proud owner of the magnificent Galaxy Z Fold 4, I’m eager to share my experience in capturing breathtaking screenshots with this versatile device. This step-by-step guide has been an invaluable asset, providing me with a comprehensive understanding of the various methods to capture both full-screen and partial screenshots. Firstly, the traditional method of pressing the Volume Down and Power buttons simultaneously remains a reliable and straightforward option. With the Side Key feature, I discovered the convenience of pressing the Side Key twice in quick succession to capture a screenshot. This method eliminates the need to fumble with two buttons, making it a breeze to capture a moment. For more precise screenshot captures, the Edge Panel offers a dedicated “Screen capture” tool that allows me to select specific areas of the display. This is incredibly useful when I need to share only a portion of my screen, such as a specific text snippet or a captivating image. Additionally, the Smart Select feature enables me to capture various shapes and sizes of screenshots, giving me unparalleled flexibility in capturing content. Moreover, the Fold 4’s unique design has brought forth innovative screenshot methods. With the Flex Mode, I can effortlessly fold the device partially and use the upper half as a dedicated screenshot capture tool. This allows me to capture content from the lower half of the display without any obstruction, resulting in pristine and uninterrupted screenshots. Finally, the Galaxy Z Fold 4 also offers Palm Swipe to Capture, a gesture-based method that empowers me to capture screenshots by simply swiping the edge of my hand across the screen. This method is incredibly intuitive and adds a touch of flair to the screenshot-taking process. In conclusion, the Galaxy Z Fold 4 empowers users with a plethora of methods to capture screenshots, each tailored to specific needs and preferences. From the classic button combination to the innovative gesture-based approach, this device has revolutionized the way I capture and share content. I highly recommend exploring these methods to unlock the full potential of the Fold 4’s screenshotting capabilities and elevate your digital interactions.
* Dan
As a tech enthusiast, I was stoked to get my hands on the Samsung Galaxy Z Fold 4, and taking screenshots was one of the first things I wanted to figure out. Thanks to this article, I’ve mastered the art of capturing screenshots on this device, and let me tell you, it’s a game-changer. The step-by-step guide is incredibly clear and easy to follow, even for a newbie like me. I especially appreciate the inclusion of screenshots at each step, which really helped me visualize the process. I love the flexibility of having multiple options for taking screenshots on the Z Fold 4. The “Power + Volume Down” shortcut is classic and always works like a charm. But for those split-screen moments, the “Palm Swipe” gesture is a lifesaver. It’s so effortless and intuitive. The “S Pen to Capture” feature is another winner, especially for capturing specific areas of the screen or editing screenshots on the fly. It’s like having a Swiss Army knife for screenshots. One thing I really wanted to try was taking screenshots while the phone was folded in half. This article showed me how to do it with the “Flex Mode Capture” feature. It’s perfect for capturing both the top and bottom sections of the screen simultaneously. Overall, this guide has given me complete mastery over screenshotting on my Galaxy Z Fold 4. I can now capture and share moments effortlessly, whether it’s a funny meme, an important document, or even a cool fold-screen layout. If you’re a proud owner of the Galaxy Z Fold 4 or are considering getting one, bookmark this article. It’s your go-to resource for taking screenshots like a pro.
* Shadowbane
As a proud owner of the Samsung Galaxy Z Fold 4, I found this guide to taking screenshots incredibly handy. I’ve always struggled with taking screenshots on foldable phones, but this step-by-step breakdown made it a breeze. I particularly appreciate the clarity of the instructions and the detailed illustrations. They made it easy to follow the steps, even for a newbie like me. I’ve never had to use multiple methods for taking screenshots before, so having both the side-button and palm-swipe gestures explained was truly helpful. The additional tips at the end of the article were also a great bonus. I had no idea you could take scrolling screenshots, and the trick for taking screenshots in apps that block it was an absolute lifesaver. Overall, this guide is an invaluable resource for anyone who wants to master the art of screenshotting on the Galaxy Z Fold 4. Whether you’re a seasoned tech user or a first-time smartphone owner, I highly recommend giving it a read. It will significantly enhance your screenshot-taking experience and make it effortless to capture and share what’s on your screen.
Robert
As a proud owner of the Galaxy Z Fold 4, I stumbled upon this article seeking guidance on how to capture the remarkable moments and visuals on my smartphone. I was thrilled to discover the step-by-step instructions provided, and I immediately put them to practice. To my delight, the process of taking screenshots on the Z Fold 4 is incredibly straightforward and accessible. I was particularly impressed by the multiple options available, allowing me to capture not only the entire screen but also a specific portion or even a scrolling screenshot. The “Volume Down + Power” button combination proved to be the most intuitive and convenient method. With a single press, I could effortlessly secure a screenshot of the current screen. However, I also discovered the “Palm Swipe” gesture, which added a touch of sophistication to the screenshot-taking process. Simply swiping the edge of my palm across the screen captured the entire active area. For more detailed screenshots, the “Smart Capture” option was a game-changer. It allowed me to extend the screenshot beyond the visible area, capturing hidden portions of the screen. This feature proved particularly useful when I wanted to share a lengthy article or website with friends. While I appreciate the versatility of the screenshot methods, I found the “Split-Screen Capture” feature to be a bit challenging at first. Coordinating the timing of the screenshot buttons on both halves of the unfolded device required some practice. However, once I mastered the technique, I could effortlessly capture screenshots of both active apps simultaneously. Overall, I found this article to be an incredibly comprehensive and user-friendly guide. It provided clear and concise instructions, enabling me to master the art of screenshotting on my Galaxy Z Fold 4. With its intuitive options and advanced features, this smartphone empowers me to capture and share my digital experiences with ease and precision.
* RedDragon
**Step-by-Step Guide to Taking Screenshots on the Galaxy Z Fold 4** The Galaxy Z Fold 4 is a powerhouse of a smartphone, and one of its many useful features is the ability to take screenshots. Whether you want to capture a moment in a game, save a recipe, or share a conversation, taking a screenshot is quick and easy on this device. **Method 1: Using the Side Key and Volume Down Button** This is the most common way to take a screenshot on any Android device, and it works the same on the Galaxy Z Fold 4. 1. Position the screen on the content you want to capture. 2. Press and hold the side key (the power button) and the volume down button simultaneously. 3. Hold both buttons for a second or two until you hear a shutter sound or see a screenshot animation. **Method 2: Using the Palm Swipe Gesture** For a more effortless approach, you can use the palm swipe gesture. 1. Navigate to the screen you want to capture. 2. Place the edge of your palm on the right side of the screen. 3. Swiftly swipe your palm across the screen from right to left. 4. You should hear a shutter sound or see a screenshot animation confirming the capture. **Method 3: Using the Smart Capture Tool (for Expanded Screenshots)** If you need to capture a longer area of the screen, such as a web page or a conversation thread, you can use the Smart Capture tool. 1. Take a regular screenshot using either Method 1 or Method 2. 2. Tap on the screenshot preview that appears in the bottom left corner of the screen. 3. Select “Scroll Capture” from the menu options. 4. The screen will automatically scroll down, capturing additional content. 5. Tap the “Done” button when you have captured the desired area. **Additional Tips** * To edit or share your screenshots, tap on the screenshot preview and select the appropriate option from the menu. * You can also access your screenshots later by opening the Gallery app and navigating to the “Screenshots” album. * If the screenshot gestures are not working, check the settings to ensure they are enabled. Go to “Settings” > “Advanced features” > “Motions and gestures” and verify that “Palm swipe to capture” is turned on.
Celeste
I’m so grateful for this comprehensive guide on taking screenshots on my Galaxy Z Fold 4! I’ve been struggling to capture images effectively on my foldable device, especially when I want to share parts of my screen. The step-by-step instructions are incredibly clear and easy to follow. I particularly appreciate the detailed explanations for taking screenshots in different modes, including the split-screen view. The combination of texts and visual aids greatly enhances my understanding. As a woman navigating the tech world, accessibility is of utmost importance to me. The guide’s user-friendly language and concise format make it accessible to everyone. I can now confidently refer to this resource whenever I need to capture screenshots on my Galaxy Z Fold 4. I’m eager to explore the creative possibilities that screenshotting offers. From sharing important information to capturing memorable moments, this guide empowers me to fully utilize my device’s capabilities. Thank you for providing such a valuable resource to the tech community!