The realm of technology can often present us with enigmatic puzzles, none more vexing than the dreaded failure of our loyal devices to replenish their weary souls. Whether your steadfast companion be a smartphone, a laptop, or any other electronic marvel, the inability to recharge its internal energy source can provoke a sense of despair and frustration. This guide delves into the labyrinthine world of device charging woes, empowering you with the knowledge to diagnose and vanquish these elusive gremlins.
Across this digital landscape, myriad factors conspire to disrupt the harmonious flow of electricity, leaving our devices languishing in a state of powerlessness. From faulty cables and capricious chargers to inscrutable software quirks, the causes of charging woes are as diverse as the devices themselves. However, armed with the right tools and a keen understanding of these electronic ailments, we can restore our digital companions to their former glory.
Cable and Charger Inspection
Table of Contents
Before delving into more complex troubleshooting, begin by thoroughly examining the cable and charger for any visible signs of damage. This may include fraying or exposed wires on the cable, or loose connections or corrosion on the charger.
Port Cleaning and Inspection
Regularly inspecting and cleaning your device’s charging port can help prevent charging issues and ensure optimal performance. Dirt, dust, and debris can accumulate over time, obstructing the connection between the charger and the device. By taking proper care of the port, you can maintain a reliable charging experience.
Here’s a step-by-step guide to cleaning and inspecting your charging port:
| Step 1: Visual Inspection | Use a magnifying glass or flashlight to examine the port for any visible debris, corrosion, or damage. |
|---|---|
| Step 2: Compressed Air or Blower | Blow out any loose dirt or dust using compressed air or a blower. Avoid using a vacuum cleaner, as it can create static that could damage the port. |
| Step 3: Cotton Swab or Toothbrush | Use a dry cotton swab or a soft-bristled toothbrush to gently remove any remaining debris. Do not use sharp objects or metal tools, as they could damage the port. |
| Step 4: Isopropyl Alcohol (Optional) | If there is any stubborn dirt or corrosion, you can use a small amount of isopropyl alcohol (90% or higher purity) applied to a cotton swab. Wipe the port gently to dissolve the residue. |
| Step 5: Dry the Port | Allow the port to dry completely before inserting the charger. You can use a hair dryer on a low setting to accelerate the drying process. |
| Step 6: Check the Cable and Charger | Ensure that the charging cable and charger are also clean and undamaged. Replace them if necessary. |
Device Reset and Calibration
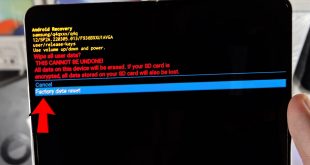
If other troubleshooting methods have proven unsuccessful, a device reset and battery calibration may be necessary. A reset restores the device to its factory settings, eliminating any potential software conflicts or glitches that could impede charging. Battery calibration, on the other hand, realigns the device’s battery reading with its actual capacity, ensuring accurate charging and battery life estimation.
Battery Performance Assessment
Accurately assessing battery performance is crucial to diagnose and resolve charging issues. This section provides a comprehensive methodology for evaluating battery health and identifying potential underlying factors that may impact device operations.
| Assessment Method | Objective |
|---|---|
| Battery Diagnostics | Runs system diagnostics to identify hardware or software issues affecting battery performance. |
| Capacity Testing | Measures the battery’s current capacity and compares it to its original specifications. |
| Discharge Rate Analysis | Monitors how quickly the battery depletes under various usage scenarios. |
| Temperature Monitoring | Tracks battery temperature during charging and usage to assess potential overheating issues. |
Software Updates and Compatibility
To maintain optimal device performance, ensuring software compatibility is crucial. Regular software updates introduce bug fixes, security enhancements, and performance optimizations that can directly impact charging capabilities.
It’s advisable to check for and install any outstanding software updates. These updates may resolve compatibility issues that could be hindering the charging process. Additionally, ensuring compatibility between your device and any charging accessories you use is essential. Using incompatible chargers or cables can lead to charging problems.
Be especially cautious when using third-party chargers and accessories. Verify that they are certified and meet the specifications recommended by the device manufacturer. By keeping your software up to date and ensuring compatibility with charging devices, you can significantly reduce the likelihood of charging issues and optimize the overall charging experience.
Wireless Charging Troubleshooting
Wireless charging provides a convenient way to power up your device, but occasional issues can arise. This section covers common troubleshooting steps to resolve wireless charging problems.
Question-Answer
Why isn’t my Galaxy phone charging?
There could be several reasons why your Galaxy phone is not charging. First, make sure that the charging cable and adapter are in good condition and properly connected to both the phone and the power source. Check for any physical damage, loose connections, or dirt that may be obstructing the charging process. Also, ensure that the power outlet you are using is functioning correctly.
My Galaxy phone charges very slowly.
Slow charging can be caused by several factors. Using a low-quality or incompatible charging cable or adapter can significantly impact the charging speed. Try using the original Samsung charger that came with your phone or a certified third-party charger. Additionally, make sure that the charging port on your phone is clean and free from debris or lint. If the issue persists, check if your phone’s software is up to date, as outdated software can sometimes affect charging efficiency.
Why does my Galaxy phone overheat when charging?
Overheating during charging can occur due to various reasons. Using a fast charger or wireless charger can generate more heat than standard chargers. Additionally, charging your phone while using it or in a warm environment can contribute to overheating. To prevent this, try using a standard charger, avoid using your phone while charging, and charge it in a cool place. If the problem persists, there may be an issue with the battery or charging components, and it’s recommended to have your phone inspected by a qualified technician.
My Galaxy phone charges intermittently.
Intermittent charging can be caused by loose connections or a damaged charging port. Inspect the charging port for any physical damage, such as bent or broken pins. Try cleaning the charging port gently with a non-metallic tool, like a toothpick, to remove any debris or lint that may be obstructing the connection. If the issue continues, it’s possible that the charging port needs to be repaired or replaced.
My Galaxy phone has stopped charging completely.
If your Galaxy phone has stopped charging completely, it could indicate a more serious issue. The battery may have reached the end of its lifespan and needs to be replaced. Alternatively, there could be a problem with the charging circuitry or the motherboard. In this case, it’s highly recommended to seek professional assistance from a qualified technician to diagnose and repair the issue.
 New mods for android everyday


